
Top Ten Dog Photography Tips
- Shaun Barr
- Feb 7, 2023
- 9 min read
Updated: Aug 26, 2023
Ten Easy Ways To Improve Your Dog Photography

The ability to capture our best friends through a photograph, to freeze in a single moment a part of their character and spirit, is just one of those things that makes photography so special for any dog lover.
But despite our best intentions the results are not always as we’d like them; sometimes far from it! Whether it’s a handsome black labrador reduced to a dark, shadowy blob or a non-stop border collie appearing as some unrecognisable, ghostly blur we can often end up being more than a little disappointed in our best efforts.
The good news is that with just a few simple tweaks to your technique and a little understanding of what causes some images to be less than stellar you could soon see a huge improvement in your pictures.
But first…
From the outset, a disclaimer – an apparent necessity these days before anyone offers advice. What follows is nothing more than my own experience, of finding ways of working and learning through many mistakes and occasional wins. I am not technically minded. I’m a right-sided brain sort of person. Science and maths are really not my thing; at least not in the way the cold, clinical and without life relevance these ‘disciplines’ are often taught in school. That much is probably self-evident from even the briefest glimpse at my photography.
I don’t really care for technically brilliant photographs – I simply want an image to move me, for my eyes to linger a little longer, to be almost reluctant to move on, and afterwards, to have some semblance of that image still marked on my mind.
Blisteringly sharp, perfectly composed, photographic rule-adhering images don’t in themselves add up to what I feel is the single most important ingredient above all else: that the photograph is compelling. So take or dismiss the following as you see fit. If you find it useful then it was worth sharing. I’ve found what works for me, sometimes. Like any photographer, I’m still learning, still making mistakes; I guess that’s another part of photography’s appeal.

1. Know your dog
A blindingly obvious one but essential for not only achieving more successful photographs but in making sure your dog avoids any stress and actually enjoys the session (or at the very least is indifferent to it!). Look out for signs of discomfort: ears back, tail untypically low, lip licking, panting and perhaps most commonly, turning away to avoid looking at the camera or you. If you see any of these signs you need to stop and give your canine model a break. Let them play and just let them do their thing: just being a dog. You can always return to photography once they're nice and relaxed again.

2. Patience is key
Closely linked to the first point but important enough to be singled out. You are likely to need this in spades; without it photographing your dog is likely to be stressful for both you and your dog. Expect and accept that your dog is likely to get bored quickly and do not overestimate their attention span – it’s often even shorter than you imagine. Instructions should be given calmly and encouragingly, never shouted or command. Barking orders may get your required behaviour but they do not make for a pleasing image or help you or your dog enjoy the session. If it isn't fun, stop.

3. Work with the light
Beyond ensuring your dog is as comfortable as they can be we move on to the most important photographic element: lighting. Understanding how differing qualities of light affect our images - for better or worse - will give you a huge advantage in achieving better results. If you can get to grips with the very basics of how light works and affects your photographs you'll be well on the way to constantly better images. It's not an exaggeration to say that a good understanding of light will improve your photography far more than an upgrade in gear.
As with most outdoor photography (as well indoor photography using natural light) the softer light of early morning and late afternoon can often offer the best opportunities for capturing your dog. The brightest light that comes in the middle part of the day can cause some problems, particularly on sunny days where harsh shadows clash with the brighter parts of the scene, often resulting in unflattering images. This is especially true throughout the summer when the sun is at its highest. Remember these are not hard and fast rules however, and they can definitely be broken. There can be some artistic merit in shooting high contrast images – indeed it’s some photographers’ trademark!
But it’s still worth being able to identify the potential pitfalls of midday photography and then finding ways to work around it if necessary. There’s absolutely no requirement to be tied down to the ‘golden hour’: that photographic holy grail which comes an hour after sunrise and an hour before sunset.
Just bear in mind that light is more evenly distributed when the sun is lower in the sky. Clouds are also your friends. They can gently diffuse the light to create more evenly exposed images. On the brightest of sunny days with cloudless skies, look out for shady areas where you’ll find most of the problems brought by harsh light will pleasingly fade away. Woodland locations are a favourite of mine anyway, but their sunlight filtering abilities give me extra incentives to shoot there when the light is too strong elsewhere. In parks and urban settings the shade of trees, hedges and walls, as well as buildings, can all prove useful.
We’ll talk about light and how we can use it to our advantage when photographing dogs in other articles – it’s that important. But these are brief tips just to get you started so for now let’s move on.

4. Eye Focus
You can choose to focus on as much of the dog as you like, but ensuring the eyes are in focus is crucial. Depending on your focal length, a shallow depth of field of f2.8 or lower may render the eyes and nothing else in focus. That's fine - we'll leave the argument as to how essential it is to have the dog's nose in focus for others to argue over - but nailing focus on the eyes is pretty much non-negotiable. Remember you’re trying to capture your dog’s personality, their real character, and capturing those eyes will really help you achieve this.

5. Get on their level
I have to say upfront that this one will often involve you returning from a photography session with your clothes grass-stained and caked in muddy dirt, but you really need to get down to your dog’s level. The upside is you will almost invariably see a big improvement in your images.
As with all these tips there are exceptions: a great dog composition can be made with the dog looking directly up towards the camera, but in general images are better taken at the same height or even lower than the dog.
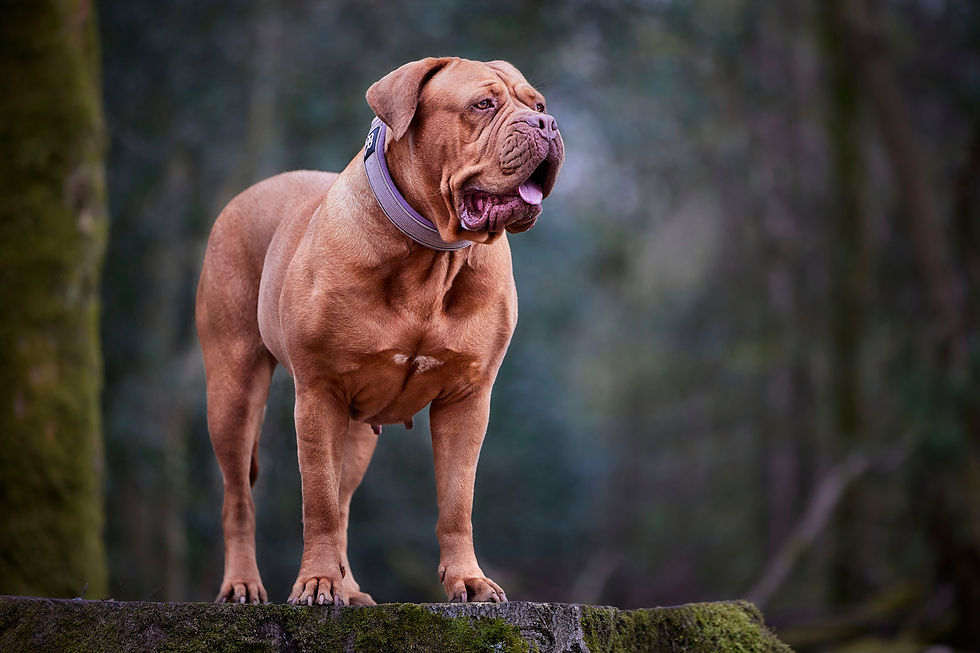
6. Use A Platform
One way of helping you easily get to eye level is to find a platform where the dog can (safely) stand, sit or lie down. As you can see in the image above, being a little below their level works effectively too. Raising your dog this way also means the dog may be more likely to stay in position for longer, particularly if yours finds it difficult to stay.
Using a platform also gets around likely obstructions, such as long grass and other vegetation, especially for smaller dogs. Never try and persuade your dog on to anything that may not be safe or that he or she is clearly not comfortable with. Let them find their balance, and settle into a position that they're happy with. Beyond those considerations the platform can be anything, a stump or log, a rock, or simply a raised hump in the ground.

7. Don't Forget The Background
Whilst you're studiously concentrating on getting your dog into just the right position and ensuring that everything is in focus, it's all too easy to forget all about the background. This can be an oversight that might come back to haunt you when you discover afterwards that you've got the dog perfectly shot but the background is terrible. Even before you look through the viewfinder, make sure that there's no clutter, distractions and anything likely to detract from the image - litter is an obvious one to look out for. Background can make or break an image, it can really set your subject up, and can help to create an appealing composition, so give some thought to making the background work for the shot you're trying to create. Just how much you want to have the background in focus will be for you to decide and will of course be determined by your aperture settings and focal length.

8. Work With Your Dog's Energy Levels
I'm fortunate to have a dog who will sit, lie down, and stay at any point of a photography session. But for more excitable dogs it makes sense to use up some of that energy that they're so desperate to burn off first. So start with some action shots and capture them running, jumping or catching a ball. A good half hour of this kind of play and you should have a much better chance of getting your dog to pose for some stationary shots. Treats and favourite toys can also be useful at this stage too.

9. Hold Their Attention
Understanding your dog is obviously a key factor in helping to keep them focussed. Every dog is different with varying levels of attention span so knowing what makes your dog tick goes a long way here. Food-focussed dogs will respond to treats, others their favourite toy, so play and reward are important. Using noises such as a squeaking toy or making silly voices and sounds should get your dog's attention, and if you're lucky a little head tilt as well.

10. Keep It Short And Fun
I mentioned this in the first point but it's important enough to warrant a separate note. If your dog becomes bored and restless it's time to stop and move on. It's vital that your dog only associates your camera with interesting and exciting play. If he or she begins to link the sight of your camera with long boring waits and commands while you fiddle with settings, you'll very soon find it much more difficult to get your dog's attention in any future photo sessions you do. By keeping it short and fun your dog will be so much more willing and engaged the next time.
Choosing The Best Camera For Dog Photography
So ten tips and we haven't even mentioned which camera might be best for dog photography? That’s no mistake. Too often we’re persuaded into thinking that the kind of camera we have dictates whether we get a good photograph or not. It really doesn’t. The ten tips above are far more important than which camera to use. Understand and put into practice those points and your photographs will be greatly improved regardless of which camera you have – whether it’s a mobile phone or a state-of-the-art professional camera. When it comes to equipment the best advice is always to learn to use what you already have. Camera gear doesn’t make a great image any more than a premium, high-end saucepan makes a delicious meal - know-how and practice do.
Of course if you feel you’ve reached the extent to what your camera can do (and with cameras’ ever increasing capability this is becoming an ever higher bar) it might be time to think about another purchase. The old adage that the best camera is the one you have with you may be true, but it all comes down to what we’re happy to carry around. The most portable of all is the mobile phone. And each release of the latest mobile model is adorned with more lenses, increased AI and loaded with an even greater plethora of options for overcoming any potential photographic obstacle: from lowlight to blurry photos. Or so it seems. There are usually no real shortcuts to a quality photograph, one that best expresses how you intended that subject or scene to be shot. That needs your input, not some computer-generated algorithm.
While it’s true most of us always have a mobile phone with us, the kind of images from them in many situations is often quite limiting – regardless of the latest innovations.
If you want something more than a phone and are looking to buy a dedicated camera the best advice I can give you is don’t be overly concerned with brand. These days there isn’t a successful brand out there that isn’t producing cameras with superb quality that is indistinguishable from another.
Of course, if you already own a long list of lenses from one brand it might well make sense to stick with that name. But if you’re buying afresh then pick the camera that best suits your needs and budget. It’s obvious, boring advice but sound.
Over the years I’ve shot with Pentax, Nikon, Olympus, Fujifilm, Sony and Canon, from compact to micro four thirds to APSC to full frame - and each and every one of them has enabled me to take great images – the bad pictures were almost always my fault.
As for lenses, if you’re just starting out, a good general-purpose zoom lens (such as 24-105mm) is a practical place to begin. It will give you a greater number of options and allow you to find out which focal lengths you prefer shooting. Whether that’s wide, tele or both
this is always a matter of personal choice and style.
I realise this is all very general and non-specific but the truth is the best advice is not to get too hung up on gear – practice and technique will get you the results you’re looking for well before any camera or lens upgrade.


Comments